
TL;DR
Lock the aspect ratio when resizing a portrait, then crop or add padding if the destination requires a different shape. Cropping fills the frame but removes edges; padding preserves the whole image. Check the exported file and the platform preview before publishing.
A square profile photo doesn't require a square-shaped face. Natural proportions depend on keeping horizontal and vertical scaling equal, even when the final image needs different dimensions.
For job seekers, freelancers, and business owners, the practical choice is usually between cropping the portrait and adding space around it. Both can preserve facial geometry; each changes the composition differently.
Aspect ratio: The relationship between an image's width and height, commonly written as 1:1, 4:5, or 3:2.
Proportional resizing: Changing width and height by the same scale factor so objects retain their shape.
Padding: Adding canvas space around an image instead of stretching it to fill a frame.
Table of Contents
Why does resizing stretch a face?
Resizing stretches a face when the image's width and height change by different proportions. Facial features then become wider, narrower, taller, or shorter than in the original. Locking the aspect ratio prevents this geometric distortion, but reaching a differently shaped output still requires cropping or adding canvas space.
The difference between size and shape
Pixel dimensions describe size; aspect ratio describes shape. A 1200 × 1800 portrait and a 600 × 900 portrait share a 2:3 ratio. Reducing the first to the second preserves facial proportions because both dimensions become half their original size.
Forcing that same 1200 × 1800 portrait into 600 × 600 halves its width but reduces its height to one-third. The face becomes vertically compressed. The problem isn't the square destination itself, but the unequal scaling used to reach it.
Three resizing choices, three different results
| Method | What changes | Effect on facial proportions | Best use |
|---|---|---|---|
| Proportional scaling | Both dimensions change equally | Preserves proportions | Making an image smaller or larger |
| Cropping | Outer image areas are removed | Preserves proportions | Filling a required frame |
| Padding | Canvas space is added | Preserves proportions | Keeping the complete portrait |
| Unlocked resizing | Width and height change independently | Can distort the face | Avoid for portraits |
A portrait can keep its complete contents, fill a new frame, or preserve its proportions, but a different aspect ratio usually prevents all three at once.
How can a portrait fit exact dimensions safely?
- Open the original portrait and confirm the required output dimensions.
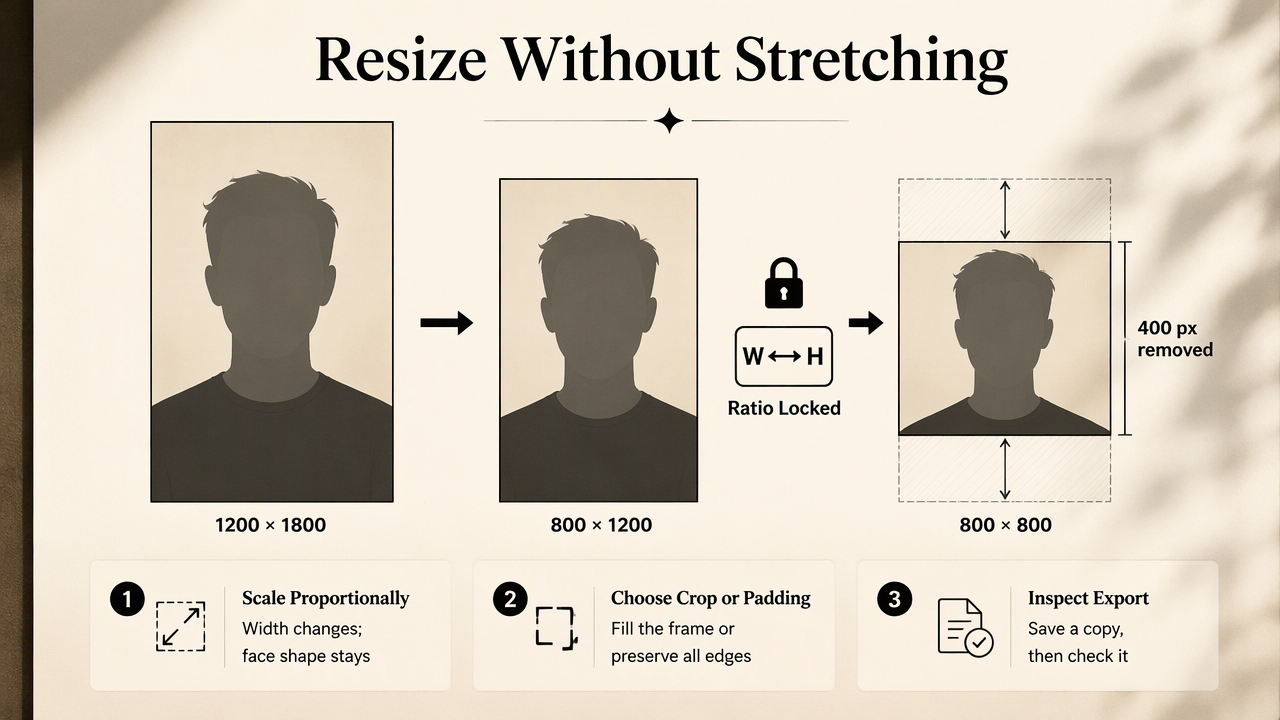
- Enable the aspect-ratio lock or linked width-and-height control.
- Scale proportionally, choosing crop-to-fill or fit-with-padding.
- Position the face with space around the hair and chin.
- Export a new copy and inspect the saved image.
Illustrated example: crop a tall portrait into a square
Suppose a 1200 × 1800 portrait needs an 800 × 800 output. Proportional scaling to 800 pixels wide produces an 800 × 1200 image. A square crop then removes 400 pixels from the height without changing the face.
Shape sequence: 1200 × 1800 portrait → 800 × 1200 scaled portrait → 800 × 800 crop.
The crop needn't remove equal amounts from the top and bottom. Moving the image within the square can preserve the hairstyle, chin, and useful shoulder detail. A close crop works well for recognition, but the framing should still feel intentional.
Illustrated example: keep the whole portrait with padding
For the same source and square destination, scaling the height to 800 pixels produces a width of about 533 pixels. Placing that portrait on an 800 × 800 canvas leaves about 267 pixels of horizontal space, divided between the sides.
Shape sequence: 1200 × 1800 portrait → approximately 533 × 800 scaled portrait → 800 × 800 padded canvas.
A background color that matches the original can make the added space less noticeable. A plain border is also predictable: it changes the frame, not the subject.
Editor controls that protect proportions
- Chain or lock icon: Keeps width and height linked during resizing.
- Crop ratio: Sets the shape of the retained area without squeezing its contents.
- Canvas size: Changes the surrounding space rather than the portrait itself.
- Fit or contain: Usually keeps the entire image visible, potentially with empty space.
- Fill or cover: Usually fills the destination while cropping overflow.
Control names vary between editors. A preview should confirm the result rather than relying on the label alone.
How can distorted profile photos be diagnosed?
Distorted profile photos can be diagnosed by comparing the original, the exported file, and the platform preview. A stretched saved file points to an editing problem; a natural saved file that looks stretched online points to display settings. Tight framing, blur, and lens perspective require different fixes from unequal scaling.
Troubleshooting by visible symptom
| Symptom | Likely explanation | Practical fix |
|---|---|---|
| Face looks wide or short | Unequal width and height scaling | Restart from the original with proportions locked |
| Face looks narrow or long | Horizontal compression or vertical expansion | Restore proportional dimensions |
| Head or chin is missing | Crop excludes important areas | Reposition the crop or add padding |
| Face looks soft | Small source enlarged or repeatedly compressed | Use a larger original and export once |
| File looks normal, website looks stretched | Display box forces both dimensions | Use proportional display sizing |
| Nose looks prominent in the original | Camera perspective rather than resizing | Choose a portrait taken from farther away |
A crop can change which features attract attention, but it doesn't change their underlying geometry. Likewise, sharpening may improve apparent detail without correcting a stretched face.
A website-specific check for freelancers
For a portfolio image, CSS such as width: 100%; height: auto; preserves the image's proportions. Inside a fixed-size box, object-fit: cover fills the box by cropping; object-fit: contain shows the whole image with possible empty space.
Always inspect the actual profile preview. A correct export can still be cropped differently by the destination interface.
Professional profile framing and Looktara
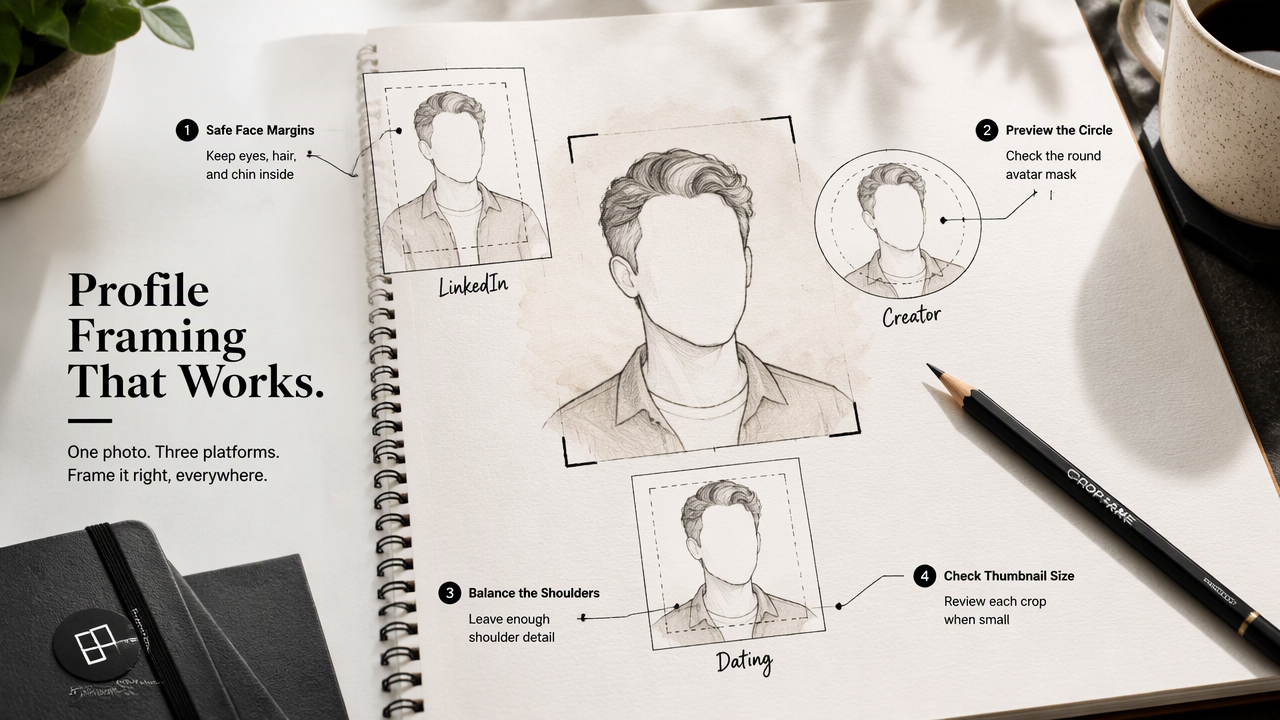
Professional profile framing works best when the face remains recognizable at small sizes and fits the destination's visible crop. A LinkedIn portrait, creator avatar, and dating profile image may use the same source, but each deserves its own composition rather than a single export reused everywhere.
A portrait-ready composition checklist
- Keep the eyes, hair, and chin comfortably inside the intended frame.
- Preview a circular mask when the destination uses a round avatar.
- Retain enough shoulder detail to make the crop feel balanced.
- Check the image at thumbnail size, not only in the editor.
- Keep an untouched original for future formats.
For dating profiles, recognizable appearance should take priority over aggressive cosmetic changes. For professional portraits, clear expression and readable framing generally matter more than decorative borders.
Planning branded imagery with Looktara
Looktara is relevant when portrait preparation forms part of a broader branded-imagery project. For fitness professionals, its LinkedIn-focused imagery page and Instagram-focused imagery page provide channel-specific starting points.
The practical handoff is a defined composition brief: intended channel, output shape, subject position, and surrounding space. Keeping those requirements separate from pixel dimensions makes the final resizing decision clearer.
Why AI generation and resizing are separate decisions
A 2024 survey of generative adversarial networks covers generative models, while 2023 research exploring GPT-4V examines a vision-language model. Neither source provides a portrait-resizing benchmark.
For this task, the distinction matters: generating image content and preserving an existing face's geometry are different operations. Ordinary proportional scaling is sufficient when only the dimensions need to change.
FAQ: keeping faces natural during resizing
These answers address common export decisions after the portrait's proportions and composition have been checked.
Can a rectangular portrait become square without cropping?
Yes. Proportionally scale the portrait until its longer side fits inside the square, then add padding along the shorter side. The complete image remains visible and facial proportions stay unchanged. The tradeoff is extra background space; removing that space would require cropping or changing the image contents.
Does changing DPI stop facial stretching?
No. DPI concerns print sizing and doesn't correct unequal horizontal and vertical scaling. For an online profile, pixel dimensions and aspect ratio are the relevant controls. A portrait with a high DPI setting can still look stretched if its width and height were forced into incompatible proportions.
Can an already stretched photo be repaired?
Sometimes, especially when the original proportions are known. Restoring the correct width-to-height relationship can reverse geometric stretching, although it won't reliably recover detail lost during resizing or compression. Starting again from the original file is preferable. Without a reference, visual adjustments may remain approximate rather than accurate.
The final export rule
Preserve the face first; adapt the frame second. Save a separate copy for each destination.
Conclusion
Start with the original portrait, lock its proportions, and choose a crop or padded canvas that fits the destination. Export once, then compare the saved file with the uploaded preview.
For a broader professional-imagery project, explore Looktara and prepare a brief with the target channel, frame shape, and preferred composition. Visit looktara.com with those requirements ready, then keep the final export proportional.
Generated by EarlySEO.com