A professional lighting setup for headshots isn't about blasting your subject with light; it's about intentional control.A professional lighting setup for headshots isn't about blasting your subject with light; it's about intentional control. Your whole job is to manage the quality, direction, and intensity of that light to create something special. The goal is nearly always the same: use soft, flattering light from a large source to sculpt the face with pleasing shadows.
The Foundation of a Flawless Headshot
Before you start sketching out complex, multi-light diagrams, let's get back to basics. The real difference between a quick snapshot and a professional portrait isn't the price tag on your gear—it's understanding how to shape light. You need to work smarter, not harder.
It all starts with knowing the difference between hard and soft light. Think of hard light as the midday sun; it comes from a small, distant source and creates sharp, unforgiving shadows. It's dramatic, sure, but it's rarely flattering for a headshot.
Soft light is the opposite. It’s what you get from a large light source, like a window on an overcast day or a strobe fired through a big softbox. This light wraps around your subject, creating soft, gentle transitions from highlight to shadow. For headshots, soft light is almost always the preferred choice because it smooths skin and renders features beautifully.
Understanding Core Principles
The most efficient place to begin is with a single light. I call this the "one-light wonder" because it's incredibly versatile and a favorite for photographers on the go. In fact, industry data shows that over 70% of freelance headshot photographers start with a single light because it can cut setup time by as much as 50%. You can learn more about how pros use this efficient setup for headshots to get incredible results.
This single source becomes your key light—it's the main light that does all the heavy lifting, defining the shape and dimension of the face. Just by moving that one light around, you can create a whole host of classic lighting patterns.
To give you an idea of where we're headed, let's quickly look at a few of the most common styles you can create. And if you want to skip the setup, you can explore how Looktara helps achieve these professional looks with AI, letting you generate perfect headshots in an instant.
Key Takeaway: Mastering one high-quality, soft light source is far more valuable than owning three mediocre ones. Your ability to control and shape that single light is the foundation of all professional headshot photography.
Here’s a quick overview of the most classic and effective lighting patterns used in professional headshots. Understanding these will give you a powerful toolkit for any session.
Classic Headshot Lighting Patterns at a Glance
| Lighting Pattern | Key Characteristic | Best For |
|---|---|---|
| Butterfly | A small, butterfly-shaped shadow under the nose. | Glamour, beauty, and formal corporate portraits. |
| Loop | A small nose shadow angled toward the corner of the mouth. | Most face shapes; a versatile, go-to pattern. |
| Rembrandt | A triangle of light on the cheek opposite the key light. | Dramatic, moody, and character-driven portraits. |
| Split | Half the face is in light, the other half is in shadow. | Strong, masculine, or highly dramatic looks. |
| Clamshell | Virtually shadowless light from above and below. | Flawless beauty and modern, clean-looking shots. |
Each pattern tells a different story and is suited for a different purpose. Learning to create them with a single light and maybe a reflector is the first major step toward mastering headshot photography.
Executing One-Light and Three-Point Setups
Moving from theory to practice is where the real fun begins. Once you get a feel for a few core lighting configurations, you'll have a reliable toolkit you can pull from for just about any headshot request. We'll start with the most essential setup in any photographer's arsenal—the single light—before building up to the industry-standard three-point system.
Before we start placing stands and modifiers, it’s worth remembering the fundamental process of shaping light. It really boils down to three decisions you have to make every single time.
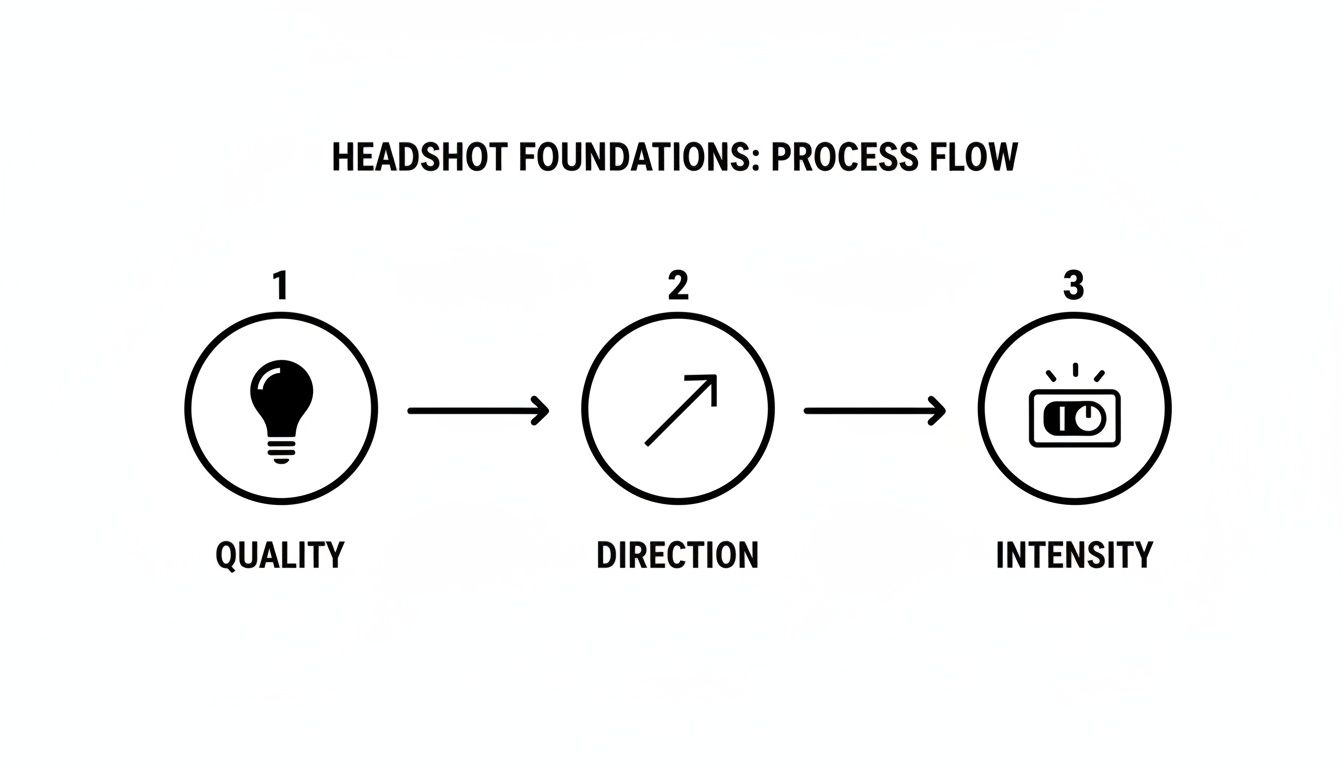
Think of this as your mental checklist. Every great shot comes from making intentional choices about these three elements, not just pointing a flash and hoping for the best.
Mastering the One-Light Setup
The one-light setup is the cornerstone of efficient and beautiful headshot photography. Don't let the simplicity fool you. With a single key light and a reflector, you can create a surprising variety of professional looks without getting tangled up in gear.
Your main goal here is to position this light to create flattering shadows that give your subject’s face shape and definition. The most common and effective starting point is placing your light at a 45-degree angle to the subject and just a bit above their eye level. This simple placement is the foundation for several classic patterns.
- Modifier Choice: A large octabox (around 48 inches) is a fantastic workhorse. Its size creates soft, wrapping light that’s incredibly forgiving and flattering for most people.
- Reflector Use: Grab a white foam core board or a 5-in-1 reflector and place it on the opposite side of your subject from the light. Its only job is to kick some light back into the shadows, softening them up and giving you control over the overall contrast.
From this basic arrangement, you can achieve totally different styles with just tiny adjustments. Raise the light higher, and you get Butterfly lighting, known for that little shadow right under the nose. Lower it slightly and shift it to the side, and you've got Loop lighting—a go-to for almost everyone.
Creating Classic Patterns with One Light
Let's walk through how to create a few specific looks with just your key light and a reflector.
Loop Lighting
This is the workhorse of headshots. It’s subtle, adds dimension, and works for nearly every face shape you'll encounter.
- Position your key light (let's say it's in a softbox) about 45 degrees to the side of your subject.
- Raise the light stand so the source is just above eye level, angled down toward them.
- Look for the shadow created by the nose. You want it to form a small "loop" that points toward the corner of the mouth, but doesn't actually connect with the shadow on the cheek.
- Bring in a reflector on the opposite side to gently soften the shadows on the darker side of the face.
Split Lighting
When you need something more dramatic and confident, split lighting is a great option. It literally divides the face into one side of light and one of shadow.
- Move your key light directly to one side of your subject, at a clean 90-degree angle.
- The light should be positioned at roughly eye level.
- This setup will light up exactly half of the face, leaving the other half in deep shadow. You can bring a reflector in close to add just a hint of detail back into the shadows if it feels too stark.
Pro Tip: With a single light, its distance from the subject changes everything. Move the light closer, and you get softer light and faster "falloff" (meaning the background gets darker). Pulling it farther away produces harder, more specular light and illuminates the whole scene more evenly.
Advancing to a Three-Point Lighting Setup
A one-light setup is incredibly powerful, but the three-point lighting system is the undisputed standard for most commercial and corporate headshots. It gives you maximum control over every aspect of the image, from sculpting the face to separating your subject from the background.
This method adds two more lights to your key light: a fill light and a hair light (sometimes called a backlight or rim light). It's no surprise that three-point lighting remains the gold standard, used in an estimated 55% of professional portrait sessions worldwide. The key light carves out the face, the fill light is dialed in to reduce shadow contrast by about 40%, and the backlight provides that crucial pop of separation. You can explore more essential tips about lighting for headshots to see just how dominant this approach is.
Here’s how the roles break down:
- Key Light: This is your main light source. You'll place it just as you would in a one-light setup to create the main lighting pattern.
- Fill Light: A second light placed on the opposite side of the camera from the key. Its only job is to fill the shadows, not create new ones. It should always be set to a lower power than the key, often at a 2:1 or 3:1 ratio.
- Hair Light: Placed behind and usually above the subject, this light (often modified with a strip box or grid) skims across the hair and shoulders. This creates a subtle rim of light that cleanly separates your subject from the background, adding a polished, professional feel and a real sense of depth.
This combination gives you ultimate control, letting you craft a dimensional, high-end portrait that meets the most demanding professional standards.
Getting Creative with Advanced Setups and Modifiers
Once you've gotten the hang of a single light or a classic three-point setup, the real fun begins. This is where you move beyond just "lighting" a person and start actively shaping the light to create a specific mood. We're talking about going from a simple snapshot to a sculpted, intentional portrait.
This next level of control isn’t really about adding more and more lights. It’s about being deliberate with your placement and, crucially, understanding how different light modifiers can completely transform your image.
Whether you’re aiming for a flawless beauty shot or a gritty, character-driven portrait, making these nuanced choices is what separates a good headshot from a truly great one.
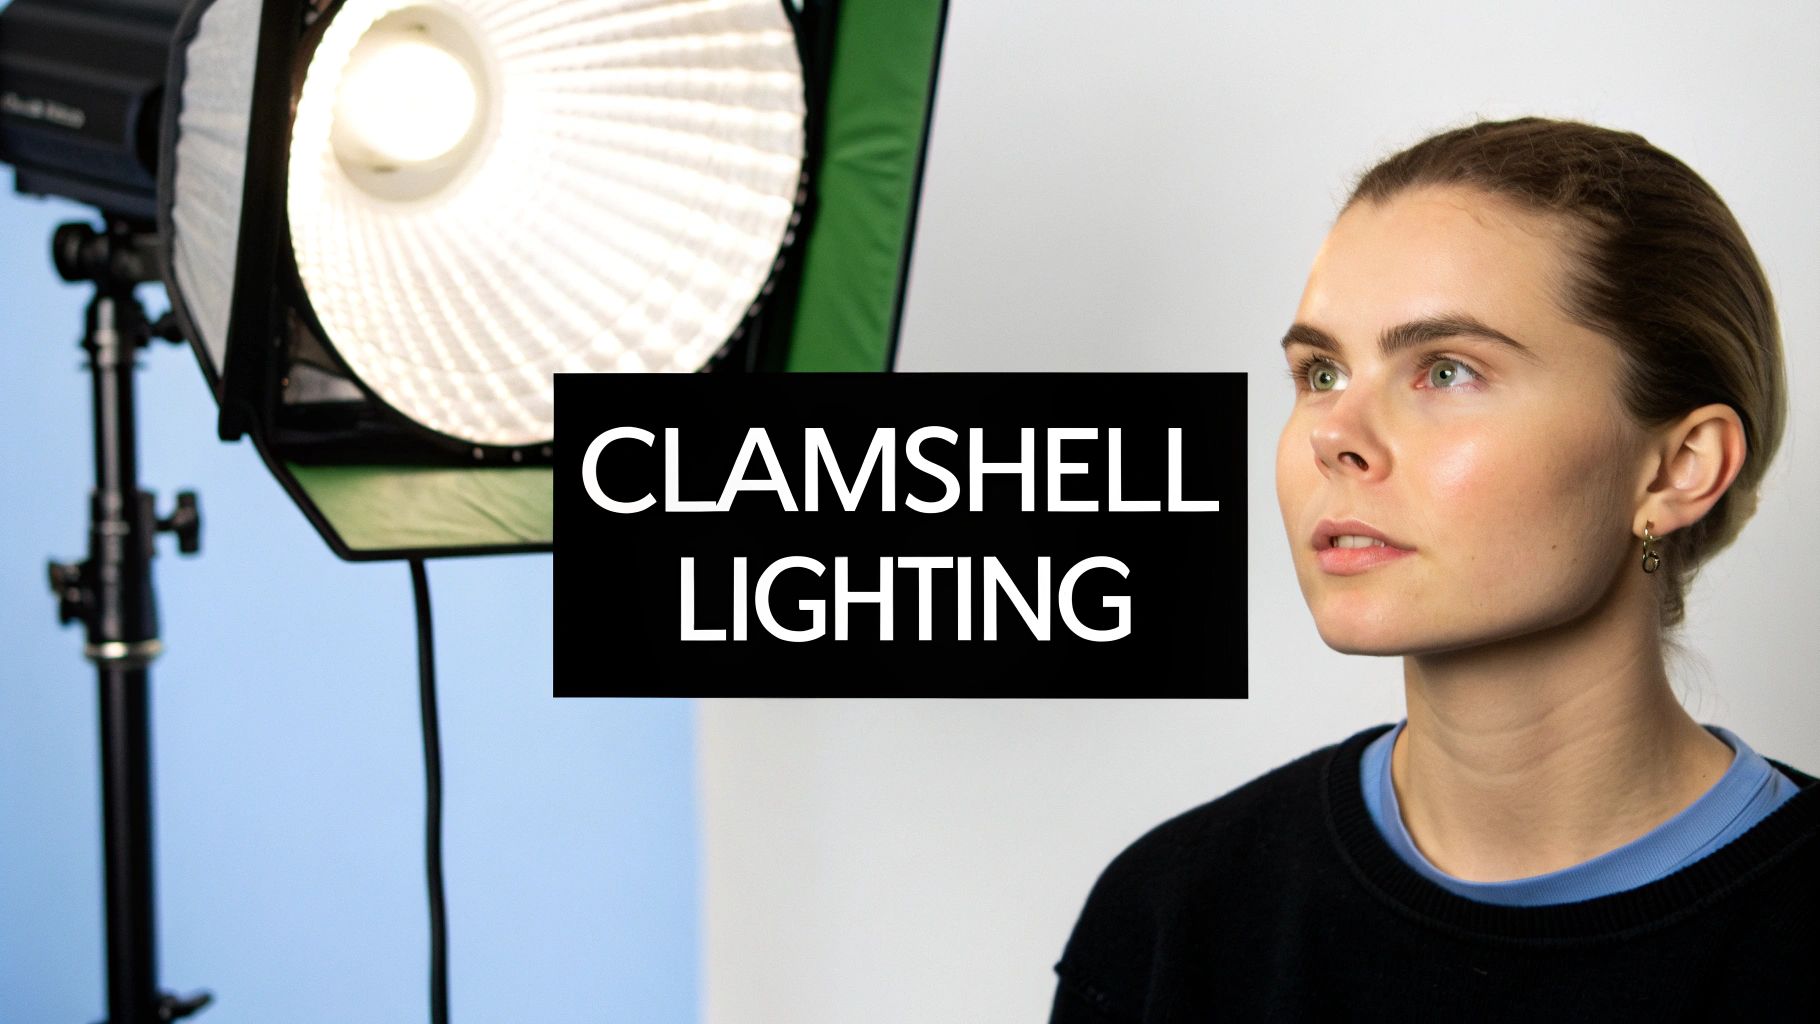
The Beauty of Clamshell Lighting
If you need a clean, modern, and incredibly flattering look, clamshell lighting is a go-to for a reason. It’s a staple in beauty and editorial work because it just works. The name is perfectly descriptive: you position two light sources in front of your subject, one above and one below, like an open clamshell.
The magic of this setup is how it creates a wash of nearly shadowless light, which has the wonderful effect of smoothing out skin texture and minimizing lines. Another signature of the clamshell is the beautiful, large catchlights it creates in the eyes, instantly making the portrait feel more alive and engaging.
Here’s how I build it out:
- The Top Light (Your Key): Start by placing your main light directly in front of your subject, high enough to angle down at roughly a 45-degree angle. A beauty dish is classic for this, but a medium octabox is a fantastic, slightly softer alternative.
- The Bottom Light (Your Fill): Now, place a second, weaker light source (or even just a big white reflector) directly under the top one, aimed up at the subject’s chin. Its only job is to soften any shadows cast by the key light above.
The secret to making clamshell look good is getting the power ratio right. Your bottom light or reflector needs to be significantly weaker than the top one. I usually aim for a 2:1 or even 3:1 ratio. This ensures you’re just kissing the shadows with a bit of fill, not creating a second, ghoulish-looking light source from below.
Expert Insight: You don't need expensive strobes for this. Clamshell works brilliantly with continuous LED panels. In fact, for beginners, using continuous lights can be easier because you see exactly how the light is falling in real-time, making it simple to dial in that perfect, glowing balance.
Crafting Drama with Rembrandt and Rim Lighting
While clamshell is all about clean beauty, sometimes you want to inject mood, depth, and character. That’s when you need to embrace the shadows with more dramatic patterns like Rembrandt and rim lighting.
Rembrandt lighting is famous for that little triangle of light you see on the cheek opposite the main light source. It's a timeless, painterly look that feels cinematic and sophisticated. The easiest way to find it is to start with a basic loop lighting setup, then just keep moving your key light further to the side and a bit higher. Watch the shadow from the nose until it just connects with the shadow on the cheek, leaving only that iconic triangle of light behind.
Rim lighting, on the other hand, is all about definition. You place one or more lights behind your subject, pointing back toward the camera. This carves out their profile, hair, and shoulders with a brilliant line of light, making them pop right off the background. It's my favorite trick for adding a polished, high-end feel to a corporate headshot or for creating a powerful, athletic portrait.
Choosing the Right Light Modifier for the Job
Your flash or LED panel produces the light, but the modifier is what gives it its character. You can use the exact same light in the same position, but swap out a softbox for a beauty dish, and you’ll get a completely different photograph. Getting a feel for these tools is what gives you true creative control.
Here’s a quick rundown of the most common modifiers and what they do:
| Modifier | Light Quality & Use Case | Catchlight Shape |
|---|---|---|
| Octabox | Gives you a gorgeous, soft, wrapping light. It's my versatile workhorse for almost any headshot because it flatters every face. | Round, natural |
| Strip Box | Creates a narrow, controlled beam of soft light. It’s perfect for creating those crisp rim lights or for use as a hair light without spilling everywhere. | Thin rectangle |
| Beauty Dish | A unique blend of soft and crisp. It creates more contrast and definition, making skin texture pop. This is the go-to for beauty and fashion. | Donut-shaped |
| Umbrella | A shoot-through umbrella gives you broad, soft light that's very forgiving. A bounce umbrella is a bit more controlled and punchy. Both are fantastic for beginners. | Round (spokes visible) |
Don’t forget about the catchlight—the tiny reflection of your light source in the subject's eyes. It might seem like a small detail, but it has a huge impact. An octabox gives you a pleasing, sun-like catchlight, while the long, skinny reflection from a strip box can look a bit strange if it’s your main light source. Paying attention to these little details is what will elevate your portraits from simply competent to truly exceptional.
Nailing Your Gear and Camera Settings
A perfect lighting setup is only half the battle. If your camera isn't configured to properly capture all that carefully shaped light, your efforts are wasted. This is where your gear choices and technical settings come together to create a clean, sharp, and professional image. Getting this right is non-negotiable.
Let’s talk gear first. You don’t need the most expensive equipment on the market, but you do need the right tools for the job. The age-old debate between strobes and continuous lights rages on, but honestly, both are fantastic options.
Strobes give you a massive burst of power, letting you easily overpower any ambient light in the room and shoot at a low ISO for squeaky-clean images. Continuous lights, like LEDs, are brilliant for newcomers because what you see is what you get, making it much easier to visualize exactly how your light is falling in real-time.
Essential Gear You Can’t Skip
Beyond the lights themselves, a few other pieces of kit are absolutely critical for a successful headshot session. Think of these as the foundation that provides the stability and control you need to pull off professional lighting patterns shot after shot.
- Sturdy Light Stands: Please don't put a $500 light on a $20 stand. It's a recipe for disaster. Invest in stable C-stands or heavy-duty light stands to keep your valuable equipment safe and locked in place.
- Reliable Triggers: If you're using strobes, you need a wireless trigger system to fire them from your camera. This little device is the brain of your entire lighting operation.
- Light Meter (Optional but Highly Recommended): Your camera’s built-in meter is good, but a handheld light meter is the gold standard for achieving dead-on, consistent exposures. It measures the light falling on your subject, not reflecting off them, which is a crucial distinction.
Your Go-To Camera Settings for Pro Headshots
With your gear sorted, it's time to dial in your camera. The goal is simple: a tack-sharp subject, a softly blurred background, and absolutely zero distracting digital noise or motion blur. These settings are a fantastic starting point for almost any studio headshot you'll take.
Aperture: The Sweet Spot
For an individual headshot, you want your subject’s eyes to be incredibly sharp, but you also need that lovely background blur to make them pop. An aperture between f/5.6 and f/11 is the professional sweet spot.
This range gives you enough depth of field to keep the whole face—from the tip of the nose to the ears—in focus, while still creating beautiful separation from the backdrop. It can be tempting to shoot wide open at f/1.8, but that often leaves you with a razor-thin focal plane where only one eye is truly sharp.
Shutter Speed: Syncing It Up
When you're working with strobes, your shutter speed really only has one job: to sync with your flash. For most cameras, the maximum sync speed is around 1/200s or 1/250s. You need to set your shutter speed at or below this number. This ensures the shutter is fully open when the flash fires, preventing those ugly black bars from ruining your photos.
In a studio setting, your shutter speed doesn't control the exposure on your subject—the power of your flash does that.
Crucial Takeaway: In a studio with strobes, your aperture controls the flash exposure on the subject, while your shutter speed controls the amount of ambient light in the shot. A faster shutter speed darkens the room's ambient light; a slower one lets more of it in.
ISO, White Balance, and Lens Choice
Finally, a few more settings will bring it all home. These are the finishing touches that guarantee a high-quality, professional file you can confidently take into post-production.
- ISO: Keep It Low. Always, always set your ISO to its base level, which is usually ISO 100 or 200. This gets you the cleanest, most detailed image possible with virtually no digital noise.
- White Balance: Set It Manually. Auto White Balance can be notoriously inconsistent from one shot to the next. Use a simple grey card or an Expodisc to set a custom white balance for perfectly accurate skin tones, every single time.
- Lens Choice: Go Long. The ideal focal length for headshots is somewhere between 85mm and 135mm. Lenses in this range give you a flattering compression that avoids the distortion wider lenses can cause, all while letting you shoot from a comfortable distance.
These settings are a fundamental part of any lighting setup for headshots, ensuring your technical execution lives up to your creative vision. For anyone building a professional presence online, combining these techniques with modern tools can be a real game-changer. You can also see how AI is shaking things up in our guide on generating a LinkedIn headshot with AI that truly stands out.
Taking Your Headshots on the Road: On-Location and DIY Setups
Let's be real—most headshots aren't taken in a perfect, multi-thousand-dollar studio. More often than not, you're working in a real-world setting, like a client's office or even your own living room. And honestly? That's perfectly fine. Some of the most authentic portraits come from adapting to the space you're in, whether that means taming the light from a giant window or getting clever on a shoestring budget.
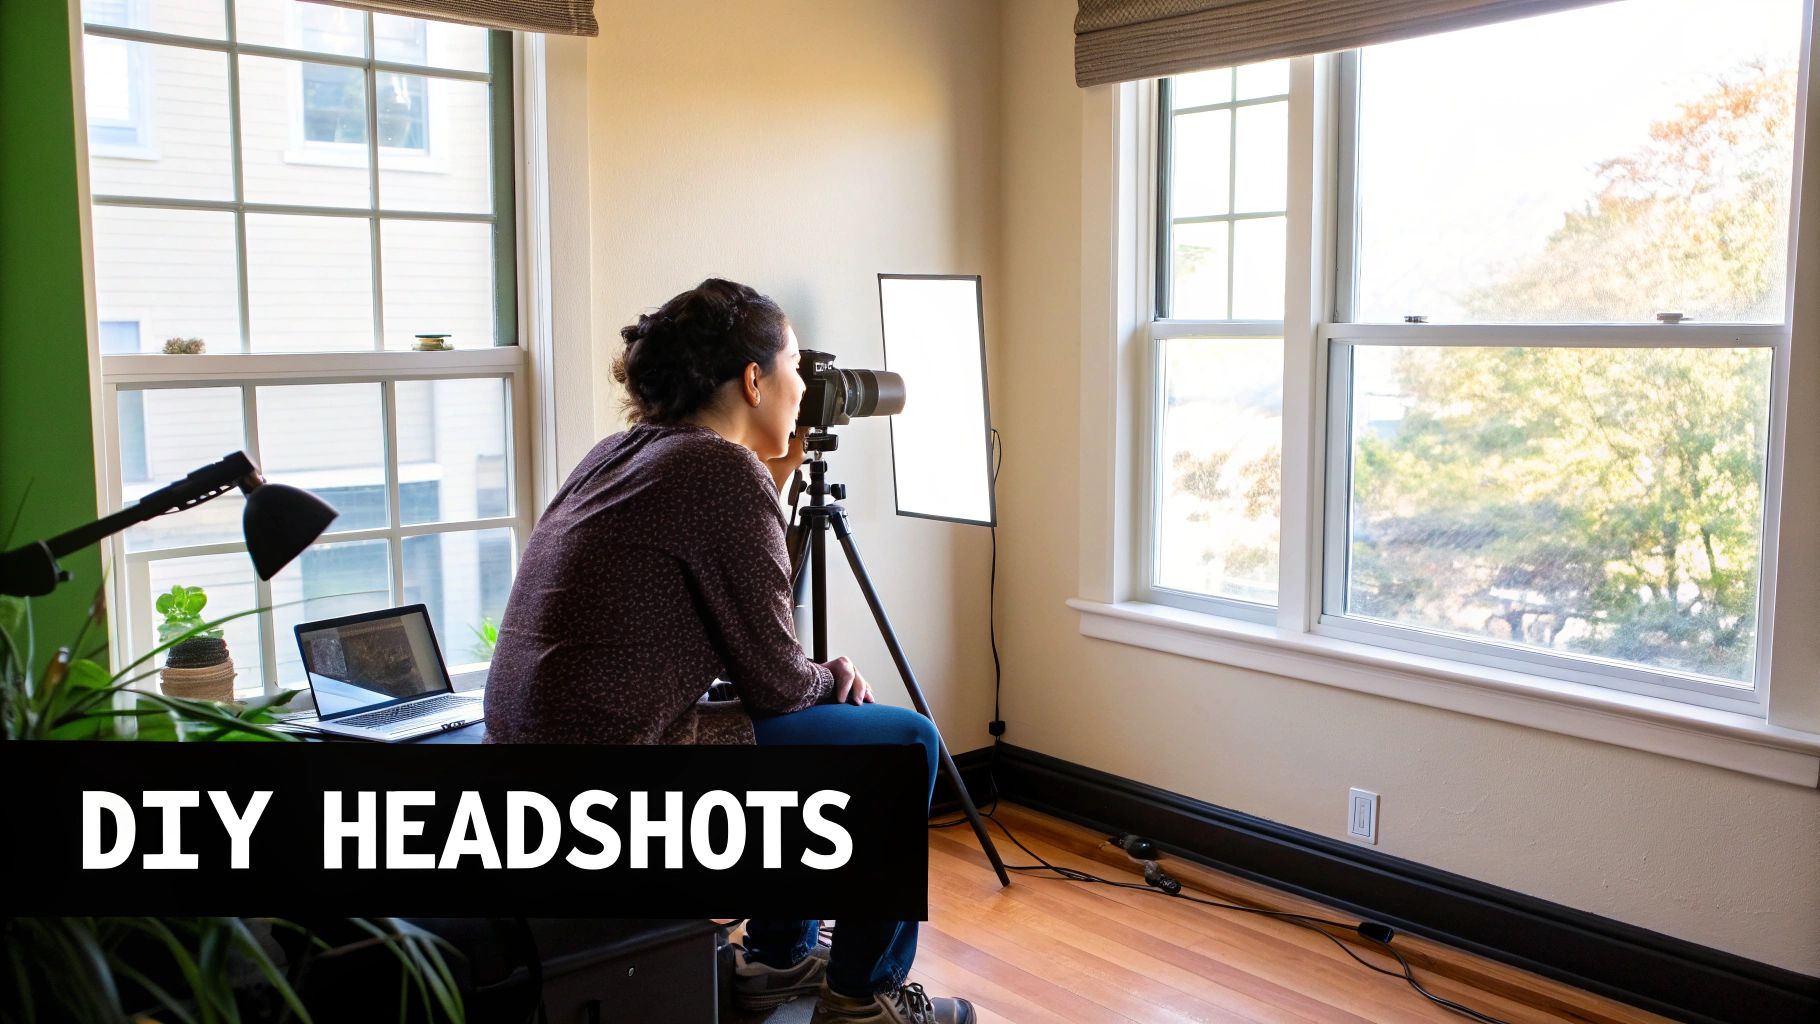
The first rule of shooting on location is to scout it out. Before you even think about unpacking your gear, take a walk. Where are the windows? Can you use them as a massive, soft light source? Find the power outlets, clock any potential background distractions, and check the ceiling height.
For corporate gigs, time is money, so efficiency is king. If you can find a clear space around 20 feet by 12 feet, you're golden. This gives you enough room for a classic three-point setup without having to worry about low ceilings casting ugly shadows from above. With a well-oiled system, a good photographer can knock out 12-15 headshots per hour on-site, a huge leap from the typical eight in a studio setting. This streamlined approach saves companies a ton of time and money.
Getting Scrappy with a DIY Approach
Don't have a truck full of strobes and modifiers? Don't sweat it. A tight budget forces you to be creative, and that's often where the magic happens. Your best lighting tool might just be the one that’s completely free.
Pro Tip: Never underestimate the power of a large, north-facing window on an overcast day. It's nature's softbox, giving you some of the most beautiful and flattering light imaginable. Learning to work with it is a core photography skill.
Try placing your subject at a 45-degree angle to that window. Boom—you've just created a natural loop light. From there, you can build out a killer DIY kit with a few cheap items from your local hardware or art store.
- Foam Core Reflectors: A simple sheet of white foam core is your best friend. Position it opposite the window to bounce soft light back into the shadows, giving you total control over the contrast.
- Black Foam Core Flags: The opposite is also true. A sheet of black foam core can be used as a "flag" to subtract light, which deepens the shadows and carves out more dimension and drama.
- Cheap LED Panels: You can find small, dimmable LED panels online for next to nothing. They make for a perfect hair light or a subtle fill light. You're not looking for a ton of power, just a little kiss of light to create separation.
How to Make Your DIY Gear Look Pro
The biggest challenge with budget lights—like a bare LED panel or a desk lamp—is that they're usually harsh and create unflattering, hard-edged shadows. The fix is always the same: make your light source bigger and softer.
An easy trick is to aim the light away from your subject and bounce it off a large white wall or the ceiling. This instantly turns the entire surface into a massive, soft light source. You could also hang a thin white bedsheet or a piece of diffusion fabric between the light and your subject.
These simple hacks prove that a great lighting setup for headshots is less about what you own and more about how you shape the light you have. This mindset is crucial whether you're a photographer setting up a shoot or a business leader looking to get the best possible corporate headshots for your team.
Answering Your Most Common Headshot Lighting Questions
Even after you've got the basics down, you're bound to run into a few tricky situations during a shoot. Getting stuck on a technical problem can really kill the momentum, so think of this section as your personal troubleshooting guide.
We'll tackle the most common questions and roadblocks photographers face when lighting headshots. The goal is to give you the confidence to adapt on the fly, solve problems quickly, and keep your sessions running smoothly.
What’s the Best Setup if I Only Have One Light?
If you’re working with minimal gear, your best bet is to place a single, large light source at a 45-degree angle to your subject. You’ll want to position it just a bit above their eye level, pointing down. This simple placement instantly creates a beautiful Loop lighting pattern, which is flattering for almost everyone.
What makes this setup so great is its versatility. Just by making tiny adjustments, you can create a whole new mood.
- Raise the light higher, and you get a more glamorous Butterfly pattern.
- Move it further to the side, and you're in the territory of dramatic Split lighting.
To really nail this one-light look, I always recommend two things:
- Go big with your modifier. An octabox or a large shoot-through umbrella will give you that soft, wrapping light that’s incredibly forgiving on skin.
- Bring in a reflector. Grab a simple white foam core board or a pop-up reflector and place it on the opposite side of your light. It’ll gently bounce light back into the shadows, softening the contrast for a clean, professional feel.
How Do I Stop Getting That Awful Glare on Glasses?
Glare on glasses is the bane of every headshot photographer's existence, but the fix is surprisingly simple once you understand what's happening. The glare is just a reflection of your light source. The trick is to change the angles so that reflection doesn't bounce straight into your camera.
The most reliable solution is to raise your main light much higher than you normally would and angle it down more steeply. This pushes the reflection downwards, out of your camera's line of sight.
If that doesn't completely kill the glare, try moving the light further off to the side, closer to a 90-degree angle from your subject. You can also ask your subject to tilt their chin down just a tiny bit. The one thing you never want to do is put a light low and directly in front of someone wearing glasses—that’s a guaranteed recipe for distracting reflections.
A Pro Tip: Sometimes the easiest fix is to have the subject ever-so-slightly lift the arms of their glasses on their ears. This changes the angle of the lenses just enough to kick the reflection away, and it's usually so subtle that you can't even tell they've done it.
Can I Use Continuous Lights Instead of Strobes for Headshots?
Absolutely. In fact, many photographers now prefer them. Modern LED continuous lights are fantastic for headshots, primarily because you see the results in real-time. There’s no guesswork—you can see exactly how the light and shadows are falling on your subject as you make adjustments, which makes the whole process much faster and more intuitive.
If you go this route, make sure you invest in lights with a high Color Rendering Index (CRI), preferably 95 or higher. A high CRI ensures that the light renders skin tones accurately, which will save you a world of hurt when you get to editing.
The main trade-off is power. Continuous lights aren't as bright as strobes, so you'll likely need to compensate with your camera settings. This usually means shooting with a wider aperture (like f/2.8) or bumping up your ISO. But for a stationary subject in a studio, they are an incredibly user-friendly and effective option.
What’s the Real Difference Between a Key Light and a Fill Light?
Getting your head around the jobs of the key light and the fill light is one of the most fundamental skills in portrait lighting. They might both be pointed at your subject, but they serve two completely different purposes.
The key light is your main light. It’s the star of the show. It's the brightest light in your setup, and its job is to establish the overall shape and lighting pattern on the face, creating the highlights and the primary shadows that give your subject dimension.
The fill light, on the other hand, is a supporting actor. It's a secondary, less powerful light that sits on the opposite side of the camera from the key. Its only job is to "fill in" the dark shadows created by the key light. It doesn't create new shadows—it just dials back the contrast. By adding a little bit of light to the dark side of the face, you can reveal more detail.
A great starting point for most corporate or branding headshots is a 2:1 ratio, meaning your key light is twice as bright as your fill. This creates a look with enough dimension to be interesting but is still clean and professional.
Ready to skip the setup and get straight to stunning results? With Looktara, you can generate studio-grade headshots in seconds, with full control over lighting, backgrounds, and style. Elevate your professional presence today at https://looktara.com.
Article created using Outrank